
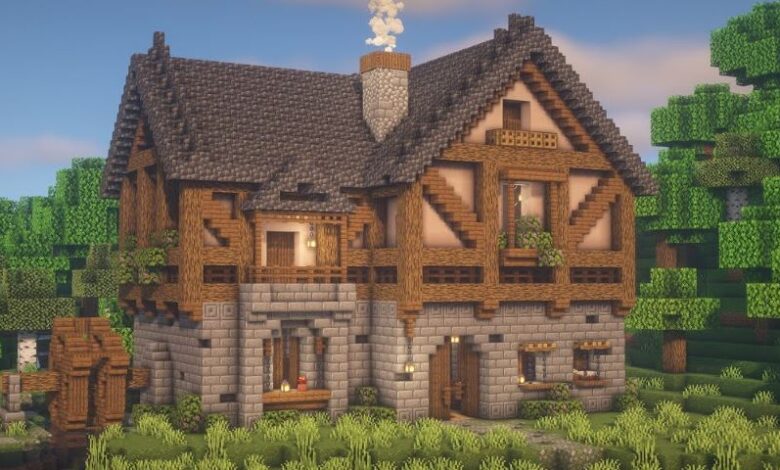
Building impressive structures in Minecraft starts with mastering the basics, and nothing transforms a simple box into a stunning home quite like a well-crafted roof. Whether you’re a complete newcomer to the blocky world or someone looking to improve your building skills, understanding roof construction will elevate your architectural game significantly. The team at House I Love has helped countless players transform their basic shelters into architectural masterpieces through proper roof design and construction techniques.
Creating the perfect roof requires more than just placing blocks randomly above your walls. The key lies in understanding proportions, choosing appropriate materials, and following proven construction methods. Many beginners struggle with making roofs that look professional and proportionate to their buildings. However, with the right guidance and practice, anyone can master this essential building skill.
Learning how to make a roof in minecraft involves understanding several fundamental concepts including slope calculations, material selection, and structural integrity. These elements work together to create roofs that not only look great but also complement your overall building design. The good news is that once you grasp these basic principles, you’ll find yourself building increasingly complex and beautiful rooftops.
Essential Materials for Roof Construction
Selecting the right materials forms the foundation of any successful roofing project. Different blocks offer unique aesthetic qualities and practical benefits that can dramatically impact your final result. Wood planks remain the most popular choice for beginners because they’re easy to obtain and work well with most architectural styles.
Stone-based materials like cobblestone, stone bricks, and andesite provide durability and a more refined appearance. These materials work exceptionally well for medieval or fortress-style buildings. Clay blocks and terracotta offer vibrant color options that can make your roof stand out from the landscape.
Newer players should start with readily available materials before experimenting with rarer blocks. Oak wood planks, cobblestone, and basic stone provide excellent starting points for learning roof construction techniques. As your skills improve and your resource collection grows, you can explore more exotic materials like prismarine, quartz, or blackstone.
Consider the surrounding environment when choosing materials. A jungle home might benefit from dark oak or jungle wood, while a desert build could use sandstone or terracotta blocks. Matching your roof to the local biome creates a more cohesive and natural-looking structure.
Basic Roof Shapes and Designs
Understanding fundamental roof shapes provides the building blocks for more complex designs. The gable roof, featuring two sloping sides that meet at a ridge, represents the most common and beginner-friendly option. This classic design works well for rectangular buildings and provides excellent proportions.
Hip roofs slope downward from all sides, creating a more pyramid-like appearance. These roofs work particularly well for square buildings and offer a more sophisticated look than simple gable designs. However, they require more planning and material calculation than basic gable roofs.
Flat roofs might seem easier to construct, but they often appear boring and lack the visual interest that sloped roofs provide. While flat roofs work well for modern architectural styles, beginners should focus on sloped designs to develop their skills.
Shed roofs feature a single sloping surface and work excellently for additions, porches, or smaller structures. They’re simple to construct and provide good practice for understanding slope angles and drainage considerations.
Combination roofs incorporate multiple shapes and levels, creating complex and visually interesting designs. These advanced techniques require solid understanding of basic shapes before attempting more complicated configurations.
Step-by-Step Construction Process
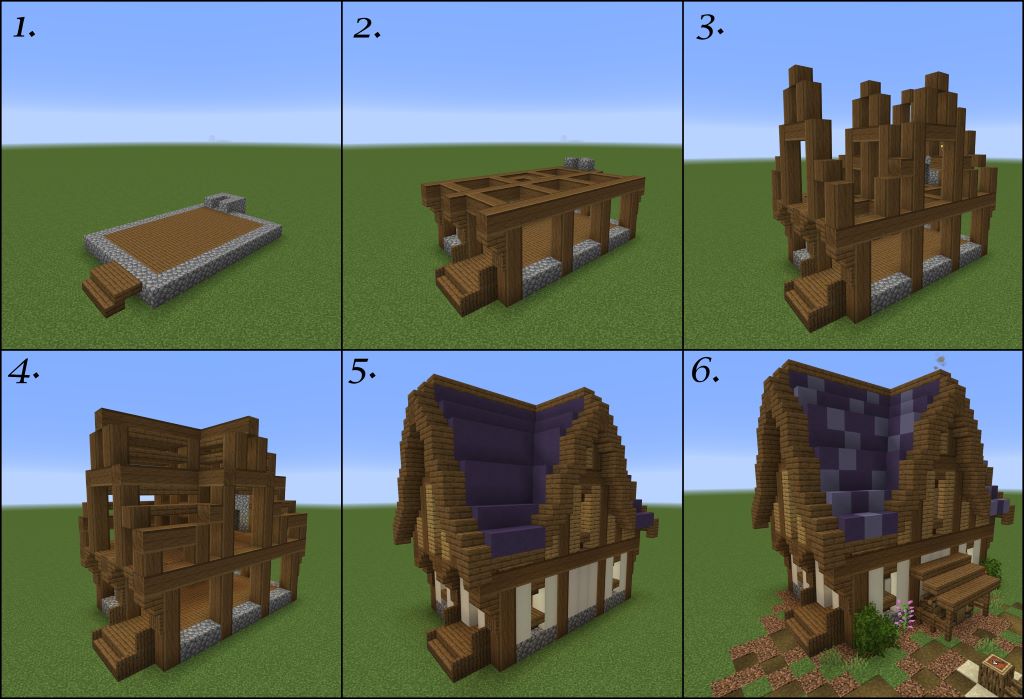
Planning your roof before placing any blocks saves time and materials while ensuring better results. Start by outlining your roof’s footprint using temporary blocks or visualizing the design in your mind. Consider how the roof will connect to your existing walls and what overhang distance looks appropriate.
Begin construction by placing blocks along the outline of your building’s walls. These blocks form the base layer of your roof and determine the overall shape. For gable roofs, start from both ends and work toward the center, maintaining consistent slopes on both sides.
Creating consistent slopes requires careful attention to block placement patterns. A common beginner technique involves stepping up one block for every two blocks placed horizontally. This creates a gentle slope that looks natural and proportionate. Steeper roofs use a one-to-one ratio, while gentler slopes might use one-to-three or one-to-four ratios.
Pay attention to symmetry throughout the construction process. Regularly step back and view your roof from different angles to ensure both sides match perfectly. Small inconsistencies become obvious from a distance and can ruin an otherwise excellent build.
Add finishing touches like chimneys, dormers, or decorative elements after completing the basic roof structure. These details transform simple roofs into architectural features that showcase your building skills.
Common Mistakes and Solutions
Many beginners create roofs that appear too small or too large for their buildings. A good rule of thumb suggests that roof height should roughly equal wall height for balanced proportions. Taller roofs work well for grand buildings, while shorter roofs suit more modest structures.
Inconsistent slopes represent another frequent problem that makes roofs appear unprofessional. Use reference points and maintain consistent ratios throughout your construction process. Counting blocks and maintaining patterns helps achieve uniform slopes across your entire roof.
Material mixing can enhance roof designs, but random placement creates chaotic appearances. Instead, use intentional patterns or gradual transitions between different block types. This creates visual interest while maintaining overall coherence.
Overhang distance significantly impacts roof appearance and functionality. Too little overhang makes roofs appear cramped against walls, while excessive overhang can make structures look top-heavy. Generally, one or two blocks of overhang provides good proportions for most builds.
Neglecting details like gutters, trim, or edge finishing leaves roofs looking incomplete. Simple additions like placing stairs blocks along roof edges or adding contrasting trim blocks can dramatically improve the final appearance.
Advanced Techniques and Tips
Incorporating different block orientations adds visual texture and depth to roof surfaces. Stairs blocks, slabs, and full blocks can be combined to create interesting patterns and realistic shingles effects. Experiment with different combinations to find patterns that match your architectural style.
Dormer windows break up large roof surfaces and add functional space to upper floors. These projecting structures require careful planning but provide excellent opportunities to practice advanced construction techniques while improving your building’s functionality.
Multiple roof levels create more dynamic and interesting silhouettes than single-level designs. Consider adding smaller roofs over bay windows, entrances, or tower sections to increase visual complexity and architectural interest.
Color variation within roof materials can simulate weathering effects or create decorative patterns. Subtle mixing of similar colored blocks adds realism, while bold contrasts can create striking geometric designs.
Landscape integration ensures your roof complements the surrounding environment. Consider how your roof will appear from various viewpoints and adjust materials or colors to blend naturally with nearby terrain features.
Maintenance and Improvements
Regular inspection helps identify areas where your roof might need improvements or repairs. Look for inconsistencies in slope, material placement, or overall symmetry that might detract from your building’s appearance.
Upgrading materials provides opportunities to refresh older builds with new blocks or techniques you’ve learned. Replacing basic materials with more sophisticated alternatives can dramatically transform existing structures.
Seasonal decorating allows you to modify roof appearance for different occasions or themes. Adding snow layers during winter builds or incorporating seasonal color schemes keeps your structures feeling fresh and current.
Documentation helps track successful techniques for future projects. Taking screenshots of particularly effective roof designs or noting successful material combinations saves time on future builds.
Conclusion
Mastering roof construction in Minecraft transforms basic shelters into impressive architectural achievements. Understanding material selection, basic shapes, and construction techniques provides the foundation for creating beautiful and proportionate rooftops. Remember that practice makes perfect, and each roof you build teaches valuable lessons for future projects.
Start with simple gable roofs using readily available materials, then gradually experiment with more complex shapes and exotic blocks as your skills develop. Pay attention to proportions, maintain consistent slopes, and don’t forget finishing details that make your roofs truly special.
The key to successful roof building lies in planning, patience, and willingness to experiment. Each project offers opportunities to refine your techniques and develop your personal building style. With time and practice, you’ll find yourself creating roofs that perfectly complement your architectural vision.
Frequently Asked Questions
What’s the best roof material for beginners? Oak wood planks offer the ideal starting material because they’re easily obtainable, work with most building styles, and provide good contrast against stone or brick walls.
How steep should my roof be? A 1:2 ratio (one block up for every two blocks across) creates attractive, moderate slopes perfect for most building styles. Steeper ratios work for dramatic effects, while gentler slopes suit modern designs.
How much overhang should roofs have? One to two blocks of overhang provides good proportions for most buildings. Larger structures can handle slightly more overhang, while smaller builds need minimal extension.
Can I build curved roofs in Minecraft? Yes, curved roofs use stair blocks and slabs arranged in circular or curved patterns. These require more advanced planning but create stunning architectural effects.
What’s the easiest roof shape for beginners? Gable roofs with two sloping sides offer the best combination of visual appeal and construction simplicity, making them perfect for learning basic roofing techniques.
Read More:
Electric Tapping Machines: Features and Benefits
